Official Manual · First Connection
Shadowrocket Setup GuideImport, routing modes, and connection checks
Using the iPhone and iPad interface, start with the details you already have and follow the steps to add a server and connect. Check the result at each step before continuing to avoid changing several settings at once.
01Add details02Choose a mode03Connect04–05Verify and troubleshoot
Keep your details somewhere easy to check before opening the app. A subscription link and the settings for a single server are different kinds of input: the former usually retrieves and updates a group of entries, while the latter describes a server's protocol, address, and authentication method. Do not enter a subscription address in Host or use an ordinary web page address as a subscription. Choose one of the two methods below; there is no need to import the same details twice.
Screenshots help identify pages and fields. Available options may vary by protocol or system, and entries shown in screenshots are not usable server details. If your interface differs, look for the English item names shown in the app.
STEP 01 · Add Server / Subscribe
Add a server or import an existing subscription
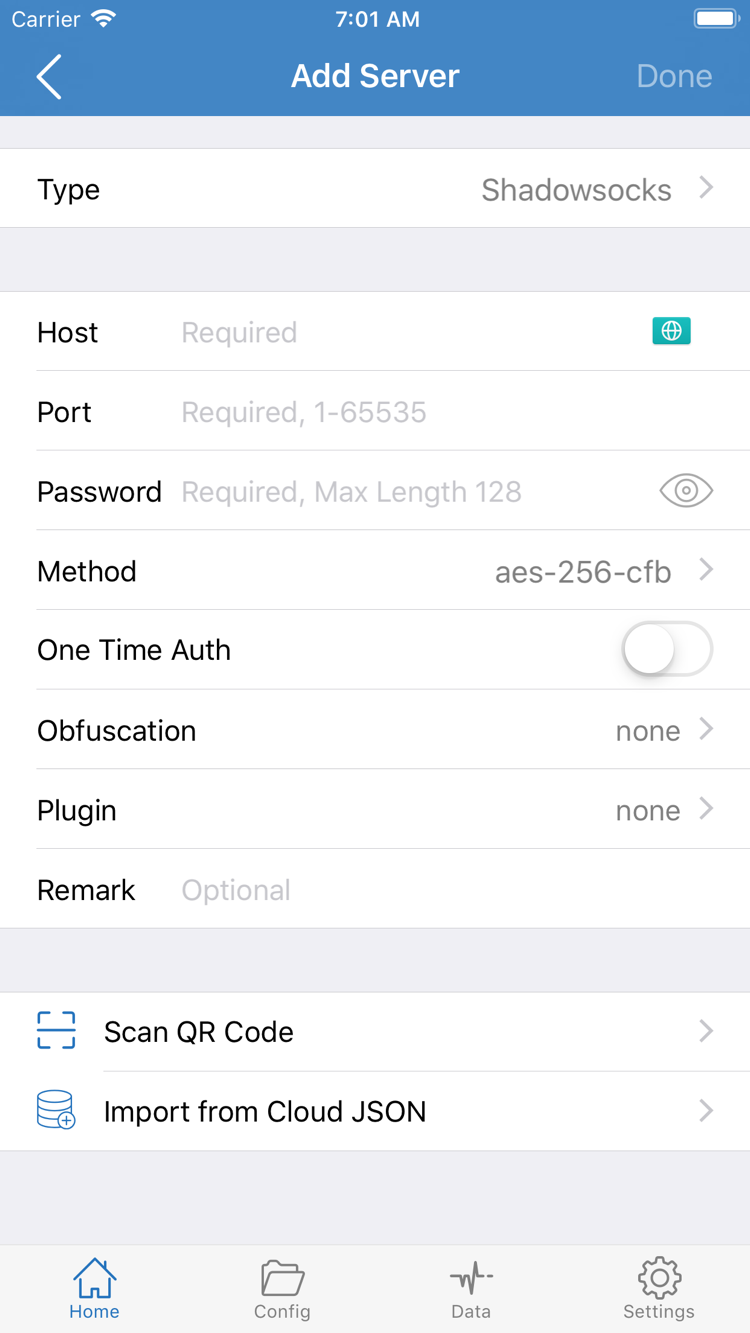
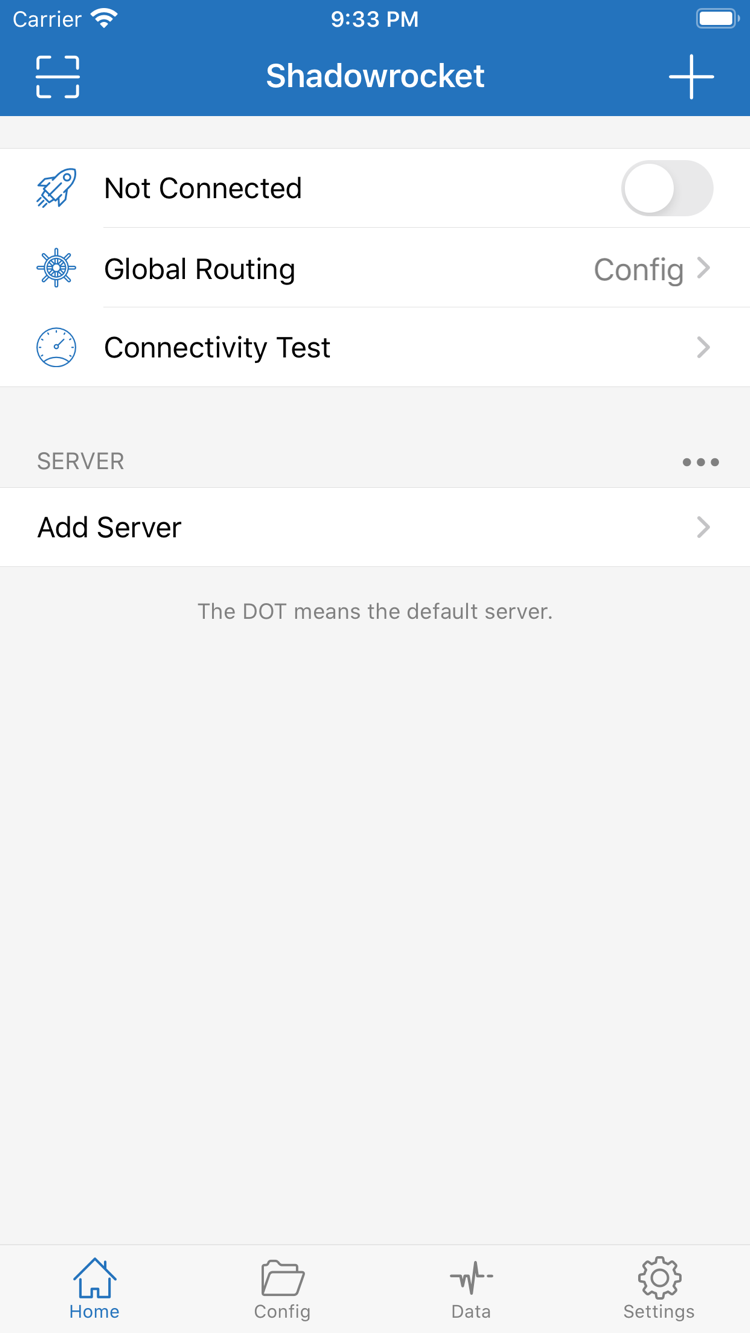
Open Shadowrocket, go to Home, and find Add Server in the SERVER group. On the add screen, check Type before entering anything else: Type determines what kind of entry you are creating and which fields you need to provide. If you have a complete subscription link, use Subscribe. If you have a server address, port, and authentication details, add the server manually.
Existing subscription: select Subscribe
Open Type in Add Server and select Subscribe. Return to the form, paste the complete subscription link into the URL field, and add a note to help identify it. Check that the beginning and end of the link are intact when copying, and do not include punctuation, line breaks, or explanatory text from a message. Query parameters are part of the link and should not be changed or removed. If the details you received are not a subscription, confirm their type first.
After saving, return to Home and wait for the subscription to load. Check that the expected group and server entries appear. A successful save only confirms that a record was added; also make sure its contents were retrieved. If the list is empty, check the original link and then try updating the subscription. Avoid creating multiple copies of the same subscription, which can make it difficult to tell which group needs maintenance. Once an entry appears, keep the existing group and continue to the next step.
Existing server details: enter the fields for its Type
For manual setup, select Shadowsocks, VMess, VLESS, Trojan, or another matching protocol based on your details. Enter the server domain or IP in Host and the port in Port. Fill in Password, Method, and any other authentication or transport fields exactly as provided. For example, with Shadowsocks, Method and Password must match the server settings; an address and port alone are not enough to connect. Fields vary by Type, so do not apply one protocol's setup to another.
If your details require TLS, a specific transport, or a server name, check each item as well. Host is usually not a web URL with a path; do not add a web page path. Scan QR Code can read QR code details. Import from Cloud JSON is only for details in that format, not a universal import option for every link. Check Type and key settings after importing, then save and return to Home.
Subscription links may contain access credentials. Do not share the complete link publicly or send screenshots that show it in full. If parsing fails after adding a subscription, check its format using the subscription troubleshooting notes on the FAQ page. Once the list contains entries, choose how to handle traffic.
STEP 02 · Global Routing / Config
Choose one of three Global Routing modes
Once your server entry is ready, return to Home and tap Global Routing. This controls how requests are handled; it does not change a server password or update a subscription. Before using the app, understand the three options and choose one for your needs: Config, Proxy, or Direct. After switching, return to Home and check that the Global Routing row shows the mode you selected.
Config: route traffic according to the active configuration
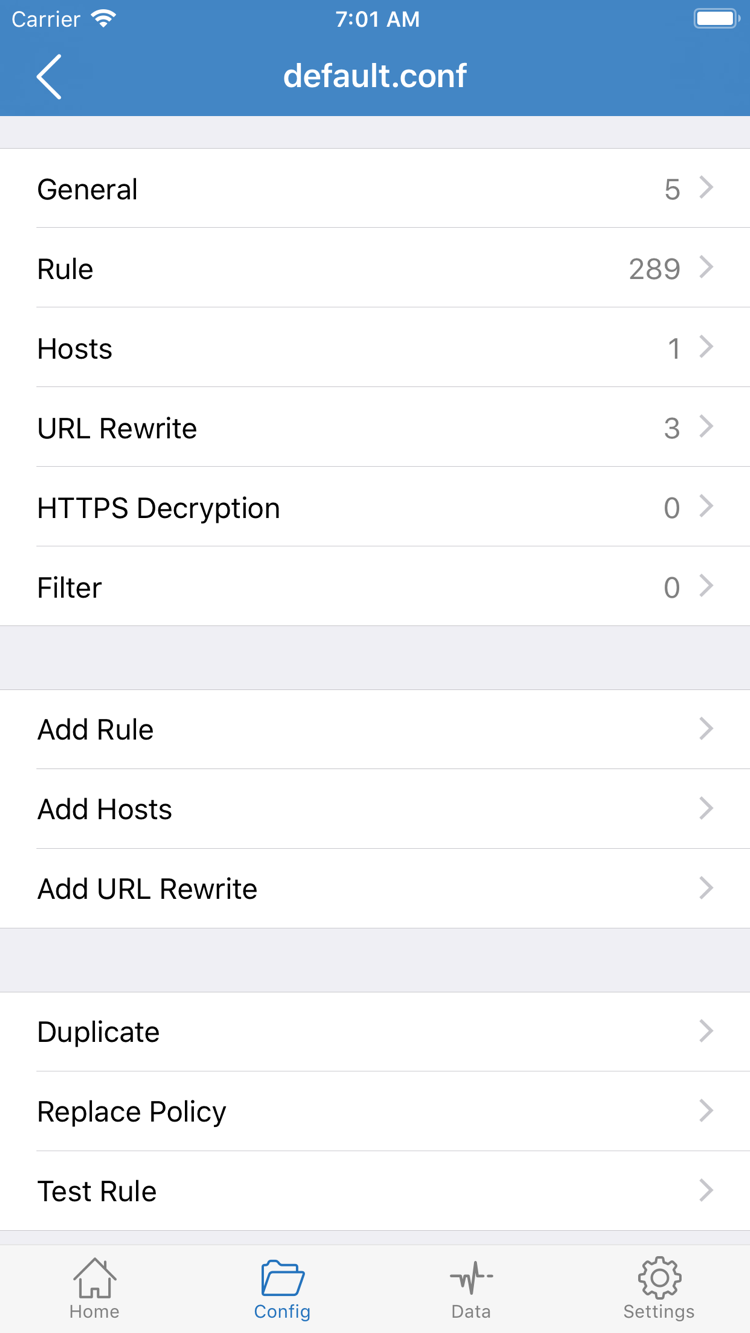
Config matches requests against the currently active configuration file. Go to Config, check which file is in use, and review its rules. The official screenshot shows the configuration editor, with sections such as General, Rule, Hosts, URL Rewrite, and HTTPS Decryption. You do not need to edit each section for a first connection, or enable every feature just to connect.
Rules are evaluated in order, and the first matching rule determines how a request is handled. FINAL usually handles requests that do not match an earlier rule. The example below illustrates syntax; it is not a replacement for your existing configuration. When using your own configuration, make sure rule targets resolve correctly in that file. Do not overwrite existing settings just to copy the example.
DOMAIN-SUFFIX,example.com,PROXY
FINAL,DIRECT
In this example, requests to example.com and its subdomains use PROXY; requests that do not match are sent to DIRECT by FINAL. DIRECT connects directly, PROXY sends requests through a proxy, and REJECT blocks them. If a website does not open, first check how its request was handled rather than assuming every server is unavailable.
Proxy and Direct: use for a clear comparison
Proxy sends requests normally controlled by this mode through the selected proxy. It can help you compare results with Config. If a site works with Proxy but not Config, check the rules, policy selection, or DNS-related settings first. This mode does not fix incorrect authentication details or guarantee the same result for every app request.
Direct handles requests using a direct connection and can help you check whether the underlying network is working. Opening a web page in Direct does not mean the server you just imported is usable. After comparing results, restore your intended everyday mode and note the active configuration file. For advanced rule ordering or policy adjustments, see the complete manual; this page covers only the checks needed for a first connection.
STEP 03 · Home / SERVER
Select a server and turn on the connection
Once you have chosen a mode, return to Home and select the server you want to use in the SERVER group. If you have multiple subscriptions, check which specific entry is marked as selected; a subscription group name is only a way to organize entries and does not mean one of its servers is selected. Select one server for the first test and avoid switching repeatedly so you can match the results to the current settings.
After confirming Global Routing, turn on the switch at the top of Home. Before connecting, the app may show Not Connected. The first time you enable the connection, the system may ask to add a VPN configuration. Check that the request comes from the Shadowrocket app you just opened, then confirm as prompted by the system and authenticate on your device if required. If you denied the configuration request, repeatedly importing a subscription will not establish a system connection; resolve the permission request first.
Return to Home and check whether the connection status changes and the switch stays on. A VPN indicator in the system can help confirm tunnel status, but status bar indicators vary by device. Check both the app display and the system VPN settings. If the switch turns off immediately, do not edit the rules yet. First check system authorization, existing VPN configurations, and any error reported by the app.
Other VPN connections or system-managed configurations on the device may affect this connection. Check which one is currently active. On a device managed by your employer or school, follow its management requirements and do not remove configurations you do not recognize. The underlying network must also be available. For example, complete any sign-in step required by a Wi-Fi network before continuing.
After the first connection, wait briefly before testing. Do not update a subscription, change the configuration, and switch networks all at once, or you will not know which change caused a different result. To disconnect, turn off the switch at the top of Home. When reconnecting later, check that the selected server and Global Routing mode have not changed during troubleshooting.
STEP 04 · Connectivity Test / Data
Check connection status and real-world access separately
Once the connection switch stays on, run Connectivity Test on Home. The test shows connectivity under the current test method; it is not a definitive result for every website, protocol, or app. A single result can also depend on the test destination, network changes, and test method. Do not judge the whole configuration by one number or directly compare readings from different methods.
Then open a browser, visit a page you can normally verify, and refresh it. A cached page may remain visible after the network changes, so an open page does not prove the current request succeeded. Test destinations expected to use a proxy and those expected to connect directly, and check Global Routing to make sure the test conditions match the mode you intend to use day to day.
Use Data as an aid, not as an instant usage total
Return to Shadowrocket and check Data for traffic changes related to your visit. The statistics usually include other requests within the reporting period, and background syncing can also generate traffic. A cumulative number therefore cannot show the exact usage of a single page. If the current view can show data by server, use it to check the selected server. To confirm which rule matched, review the relevant records and diagnostics.
Consider three questions separately: Is the system connection established? Can the destination request complete? Is the request handled according to the rules? The first two can work while the third does not. For example, a destination may open in Config but have matched DIRECT. Conversely, if it works with Proxy but fails with Config, check the routing path first instead of repeatedly adding the same server.
- Connectivity Test returns a result, but a page fails: Check the specific destination, DNS, and rules instead of assuming the whole setup works.
- Browsing works, but the test fails: Check whether the test method and destination suit the current network; do not change the entire configuration for one test.
- Results differ between Wi-Fi and cellular networks: Keep the same server and mode for comparison to avoid interference from other changes.
After the first verification, note the working server, current mode, and configuration file name. This gives you a baseline for troubleshooting later. Do not repeatedly change settings that have already been verified just to chase a particular test result. If you still have issues, troubleshoot the point of failure below.
STEP 05 · Settings / Diagnostics
Troubleshoot the point of failure, not every setting at once
First identify where the issue occurs, then decide which page to check. Treating “subscription will not load,” “the top switch will not stay on,” and “a website will not open” as the same connection failure leads to confusing troubleshooting. Change one variable per round and repeat the verification in Step 04. If there is no improvement, restore the previous value before checking the next item so you can retrace your steps.
Empty list or failed update: check the subscription details
Check that the link is complete, its type is Subscribe, and the underlying network can complete an update. Retrieving a subscription and connecting to a server in it are separate things. If the link has expired, changing Global Routing will not help. Repeated updates cannot fix details that are no longer valid on the service provider's end. Ask your own service provider to confirm the link status, content format, and relevant account status. Do not post complete credentials on a public page when contacting them.
Entries appear but the connection fails: check settings and system status
For manually added entries, check Type, Host, Port, authentication details, and any required TLS or transport settings. For subscription entries, update once and test a server known to suit your current use. If the switch turns off immediately, check system VPN authorization and other active configurations. If the switch stays on but access fails, distinguish between server connectivity, rules, and destination access. Do not immediately delete all your data.
Test and browsing results differ: check Test Method
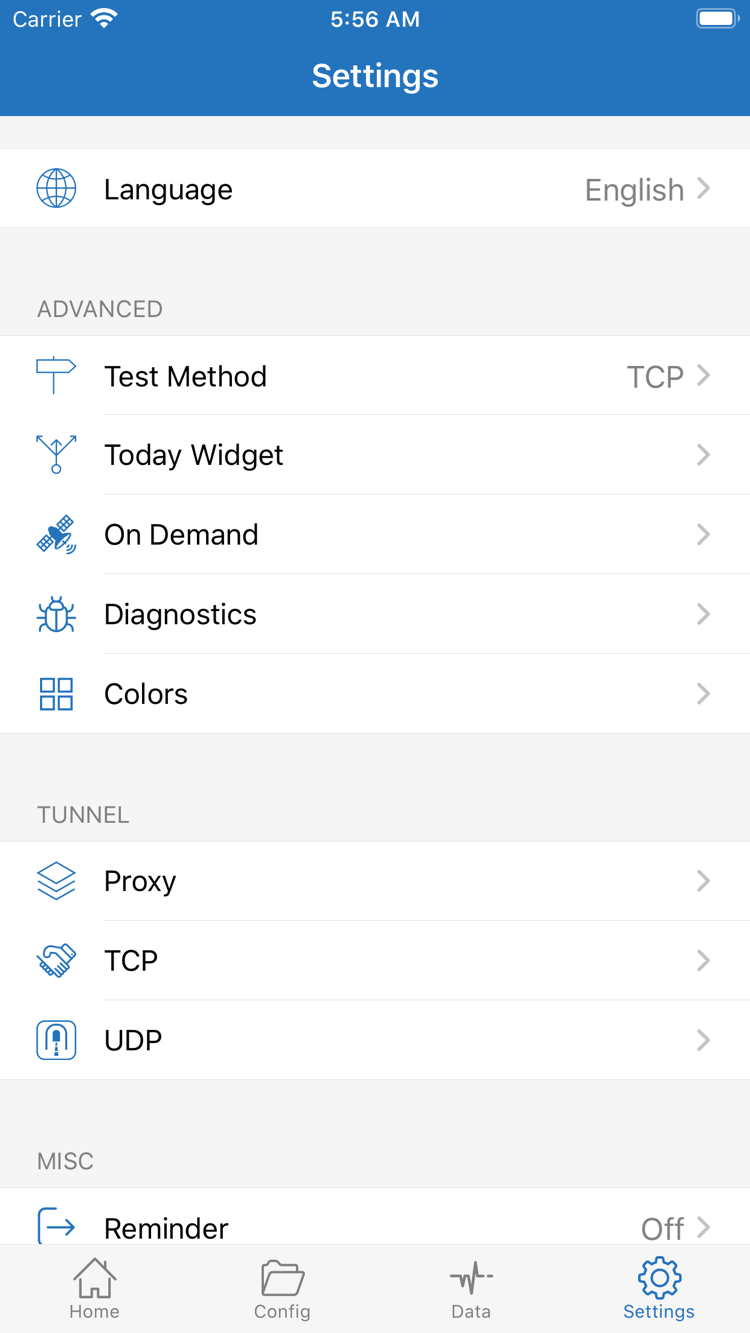
Open Settings and check Test Method to see which test method is active. Different methods check different aspects of connectivity, and receiving a test result does not verify the complete request to a destination website. Keep the original setting, then compare one item at a time and use real-world access to guide your judgment. If only one destination has an issue, note its domain, when the issue occurred, the current mode, and the error. This is more useful than simply noting that it does not work.
Automatic connection or network switching issues: check On Demand
On Demand in Settings relates to conditions for connecting on demand. If the app reconnects after you turn it off manually or behaves differently when the network changes, check whether the relevant conditions are configured. For a first setup, verify manual connection before configuring on-demand behavior. On Demand does not fix server authentication failures; it controls when a connection is attempted, not whether the server details are valid.
To investigate further, open Diagnostics and first confirm that the records correspond to your latest test. Identify the type of error. Before sharing records, hide subscription URLs, passwords, authentication identifiers, and other sensitive information. Settings such as Proxy, TCP, and UDP affect different network behavior; do not switch them one by one based on their names. See the complete manual for details, or the FAQ page for common symptoms and troubleshooting paths.